
Now that Windows 7 is creeping up on general availability, you’ll probably want to remove your RC installation. I assume most of you interested are running these pre-release versions in a dual boot configuration, and so this directly corresponds to our dual boot guide.
If you recall, in the dual boot guide we looked at two separate (yet, fundamentally identical) approaches to creating a new partition with Windows XP or Vista and we intend to do the same here.
Because we originally developed this guide when Microsoft was releasing Windows 7 betas and release candidates, we aim at removing those versions in favor of the now nearly available final version. It should be mentioned however that you could potentially follow the same guidelines as explained below to remove your older XP or Vista installations (while in a dual boot configuration) in favor of Windows 7 Final.
Before you light the match
remember that all accumulated documents, pictures, songs, videos etc. on the Windows partition you are deleting will be gone. If you haven't made a backup yet, please do so before proceeding.
Removing Windows 7 partition - For Vista usersIf you are currently running Windows Vista, we can use its built-in tools to manipulate your hard drive partitions. If you prefer to use a third-party utility, you can follow the GParted instructions on the next page. Also, be sure to have your Vista DVD on-hand to repair potential boot loader complications.Boot up Vista, click the Start menu and enter “diskmgmt.msc” into the search bar. A window titled “Disk Management” should open displaying basic information about the drives attached to your PC.
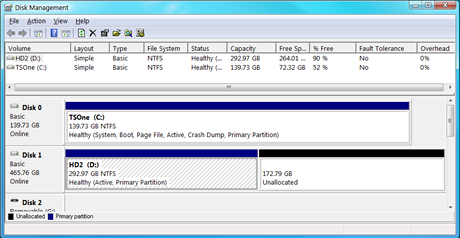
Right click the partition you previously created for Windows 7 (it's probably the second partition on “Disk 0” if you followed our previous guide) and opt to “Delete Volume”.
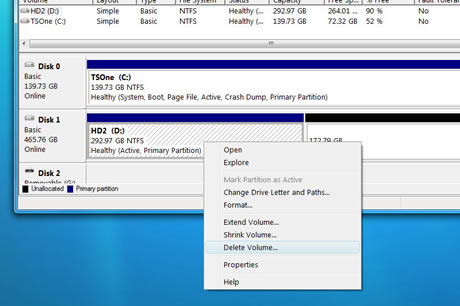
You should now see unallocated space on your hard drive where Windows 7 once lay.
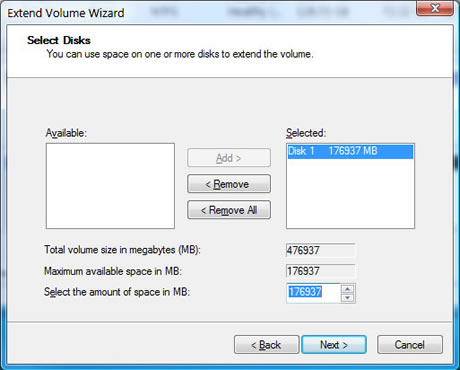
Right click your original (and probably only remaining) partition, choose “Extend Volume” and enter the full capacity of the unallocated space.
Repairing Vista's boot loader:Now, you may or may not be able to boot into Vista as you've just potentially botched your boot loader (don't worry).
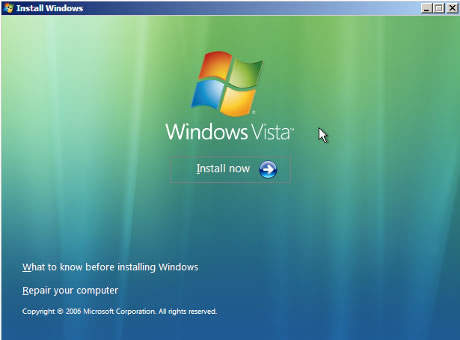
Even if you can access Vista and want to get rid of the OS selection during boot up continue reading.Break out your Vista DVD, boot from it and after the initial loading process is completed you should be met with a screen with three options; “Install now”, “What to know before installing Windows” and “Repair your computer”. We want the third option, “Repair your computer”
You'll then be asked to choose a recovery tool. Choose the first one there, “Startup Repair”.
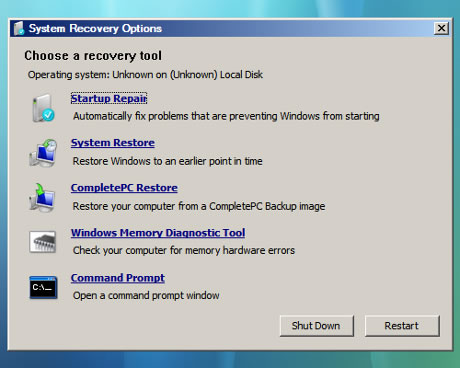
In a relatively short amount of time it will proclaim the issue(s) to be resolved, at which point all should be well. Reboot and remove your Vista DVD.
Removing Windows 7 partition - For XP usersThis process is essentially the same as the previous page, but using the third-party tool GParted instead of Windows’ Disk Management utility. Be sure to have your XP CD on-hand to repair potential boot loader complications.
Download the latest copy of GParted here:
http://sourceforge.net/projects/gparted/files/gparted-live-stable/0.4.6-1/gparted-live-0.4.6-1.iso/download , and then burn it to a disc as an image file.
After you've downloaded and burned your image of GParted, pop it into your optical drive and reboot. Shortly after booting off the disc you'll have to choose your preferred language, keymap and screen resolution.
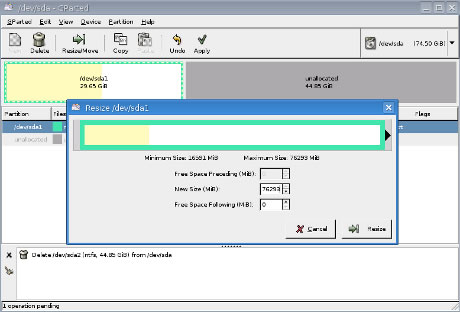
Once the partition software has loaded, right click the partition where Windows 7 resides (it's probably the second partition on “dev/hda1” if you followed our previous guide) and choose “Delete”. You should now see unallocated space on your hard drive where Windows 7 once called home.
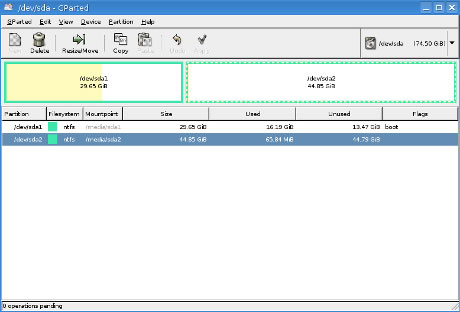
Right click your original (and likely only remaining) partition, choose “Resize/Move” and fill in 0 for both the free space preceding and following to occupy the entire unallocated space.
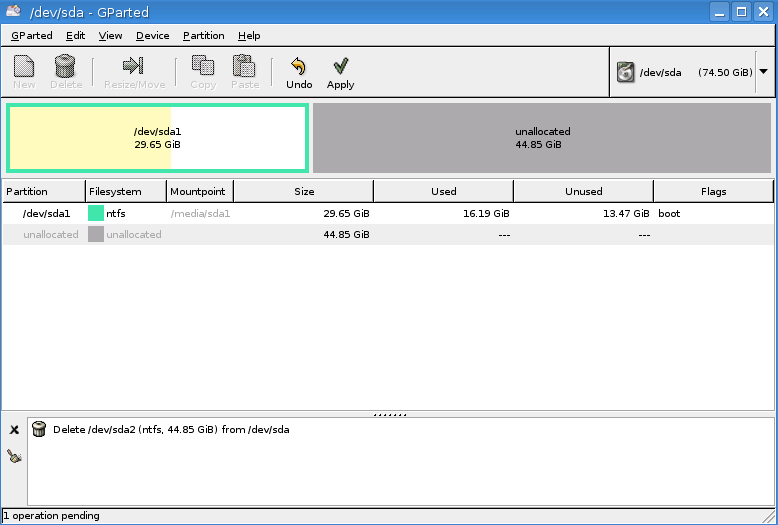
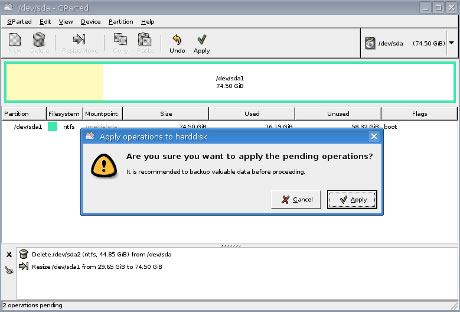
 Be sure to click apply
 up top or no changes will be made.
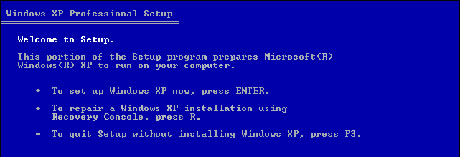
 Repairing XP's boot loader:
Now, you may or may not be able to boot into XP as you've just potentially botched your boot loader (don't worry). Even if you can access XP and want to get rid of the OS selection during boot up continue reading.
Boot using your Windows XP CD and after the initial loading process you should be met with three options; “Enter” to setup Windows, “R” to load the Recovery Console and “F3” to quit without doing anything. We want to hit “R”.
The Recovery Console will search for instances of Windows and ask you to select one (there will probably only be one). Enter the number pertaining to your XP installation, and you'll be prompted for the Administrator password (if you're not sure what it is you likely don't have one, just hit enter).
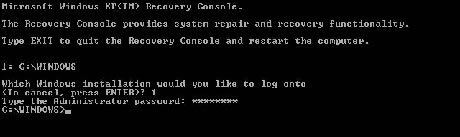
Now, enter “fixmbr” (confirm with “y”) and upon completion enter “fixboot” (confirm with “y”).
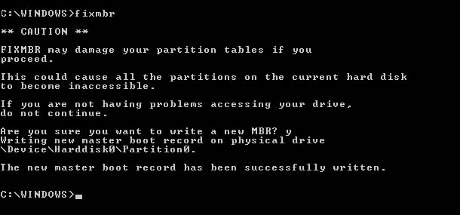

Enter “exit” to reboot your system. Remove your XP CD and you should be good to go.
(TechSpot)


 very nice thanks